Improving the Valve Index with upgraded headphones. Because the built-in off-ears are just BAD.

Its 2022 and the Valve Index continues to be the best all-round VR package. The tracking, controllers, FOV, refresh rate and comfort are all a cut above the others. For me the only thing that was lacking was the built in off-ear headphone speakers, which I fixed by replacing them with modded Koss PortaPros in 2020, documented here.

I recently re-fitted the original valve off-ear headphones just to remind myself of how bad they sound compared to good headphones, and yep – confirmation they still sound terrible for music. The highs are harsh, and there is zero bass below 40hz. I’m utterly bewildered that people think they sound good in any way. If anyone is playing Beat Saber using the built in headphones – you’re doing it wrong. Try some decent IEMs (or even cheap ones!) – you’ll be blown away.

My original mod has been perfect for me, but for people with smaller heads, the fit was not great.
I’ve now rectified this by designing a bracket that mounts the PortaPros from the back, so that they are on the correct angle for ears. The result is a considerably better fit for differing head sizes.

The last photo shows some of the evolution of this custom bracket. It can slide forward and provides a good degree of vertical adjustment by rotating the PortaPros. The bracket is available on Thingiverse here. Please see my original post on the mod for wiring details etc. Don’t forget to install Equalizer APO and use my profile (fixme upload this tomorrow) to get the Koss’s sounding perfect. I hope this helps more people get better sound on the Valve Index.

Fixing the Valve Index’s missing sub-bass audio.

Valve put a lot of R&D into the off-ear headphone solution shipped with the Index. Unfortunately one of the big compromises they made was that it has absolutely zero response below 40hz. If you record the bottom string of a drop-D bass guitar, you simply wont hear it on a stock Index. Unsurprisingly, explosions lack the usual expected rumble, and music games like Beat Saber sound weak with no punch on the EDM tracks. This was a show-stopper for me – I immediately permanently removed the off-ear headphones and used some quality IEM’s instead. Sorry Valve for the hard feedback: compromising on bass was a bad call.

Heres my first attempt at resolving the audio problem with this otherwise remarkable VR headset. I went with the Koss PortaPro mod route, to get a Rift CV1-like sound.

  • The quest strap bracket from here (thanks meisenhut31) was printed at 1.3x size to fit the index.
  • I ended up not using the included holes on the 3d print but drilling my own, as a bit more angle was required. This extra angle is shown in a below photo. I might revise the design and redo this properly later.
  • The easiest way to dismantle the Porta Pros is angle grind off the metal head strap. Otherwise you’ll need to drill out a pop rivet under the label and re-build somehow.
  • The tension mechanism in the Porta Pros works nicely – once the headset is donned,  pushing the headphones inwards causes the mechanism to click twice as it ratchets in.
  • The wiring was uneventful apart from needing to find a very thin 3.5mm headphone jack – the right-angled one that comes with the porta pros wont work.
  • I had to file back the bracket on the left side to accommodate the headset cable retention mount.
  • As-yet untested with glasses. I’ll update this later.

The amount of bass below 100hz generated by these headphones is tightly related to how firm they are pressing on your ears. Getting the correct angle is critical here.  The following screenshot is my initial tune in Equalizer APO to get the Porta Pros sounding flat. Yes I realise this will clip badly if pushed hard. The Index DAC and headphone amp does seem to have a bit of headroom, but you will need to play it by ear and turn the volume down a bit if you can hear clipping.

The reason for gaining it up this high was to get an acceptable level at 100% volume in Beat Saber.  It sounds great, with plenty of volume linear down to 30hz and drops off to barely audible at 20hz. On my set of Porta Pros i have a slight air flutter at 25-40hz from the right side only. It doesn’t bother me but goes to show they’re very far from perfect. It should also be noted the amount of boost that was required on the top end to get these sounding linear. My set sounded very muffled by default.

It’s tempting to have another crack at the angle of the mounting to get a firmer fitting and reduce the correction at 22hz, but the extra ear pressure would be uncomfortable. As it is, this feels exactly like a Rift CV1 – very comfortable.

I’m about 90% happy with how this turned out. I’d like to find a better sounding on-ear headphone (linear 20hz-20khz without pressing hard on ears) with a spring mechanism and efficient enough to not run into the headphone amp ceiling. All in all, after EQ, the Porta Pros do sound considerably better than the Valve Index off-ear’s, but there’s room for improvement.

Soap Opera Effect makes everything look better.

My new hobby: applying motion interpolation to all the things.

Watching youtube game footage interpolated from 60FPS to 144FPS (on a gaming monitor obviously) looks amazing, and much closer to how the player saw it.

Interpolating movies from 24FPS to 60FPS looks equally stunning, albeit with more noticeable motion artifacts due to the dismal source frame rate.

This is made possible for me using phiresky’s excellent Vapoursynth script as documented here:
https://gist.github.com/phiresky/4bfcfbbd05b3c2ed8645

A ryzen 2700X can, in realtime, interpolate youtube 1080p60 game footage to 1080p144, or 1440p30 (looking at you Tested, Linus Media Group) to 1440p60. Protip for linux users: mpv can stream youtube, vimeo and twitch URLs directly, whilst interpolating to a delicious 144FPS, given enough CPU cores.

Enjoy the following pre-rendered movie trailer demo using the vspipe|ffmpeg technique. The first playing is the unaltered original. Make sure you’re using a p60 quality in youtube.

Simple Oculus Quest comfort mod.

By default the Quest is quite front-heavy for long sessions. Heres a quick tip for taking the weight off your face: Add 110g of weight to the back strap and a strap over the top of your head supporting the side arms. I used a bit of scrap iron and a few velcro cable ties. With this setup it is possible to adjust the Quest to feel more like a Rift CV1 on the face. It still fits in the hardcase perfectly.

Forcing xscreensaver to display one hack over multiple monitors.

So xscreensaver’s author Jamie Zawinski has previously stated he thinks most of the hacks look bad stretched across multiple monitors Around about version 4.12, multi monitor support turned into “one hack per screen”. After going through the large list of hacks, I thoroughly disagree. Most of them look really good, and some of them – like the above depicted “lattice” look stunning – especially at buttery smooth 144hz.

The following patch against drivers/screens.c in xscreensaver v5.40 make this possible in my setup. The resolution is hard-coded – I hope in the future I can convince Jamie or one of the other maintainers to implement a more elegant solution. In essence we’re fooling xscreensaver into thinking theres 1 big screen – 5920 x 1440 (with a few wasted pixels due to the mismatched screen resolutions in my case).

$ diff screens-original.c screens.c
387a388,389
>       /* one hack over multi-monitor patch - blatantly overrule what randr thinks */
>       nscreens = 1;
450c452,453
<           for (k = 0; k < res->noutput; k++, j++)
---
>         /* one hack over multi-monitor patch - ignore randr number of outputs, force 1 */
>         for (k = 0; k < 1; k++, j++)
469,472c472,476
<                   m->x      = crtci->x;
<                   m->y      = crtci->y;
<                   m->width  = crtci->width;
<                   m->height = crtci->height;
---
>                   /* one hack over multi-monitor patch - hardcoded resolution for this workstation's "single" screen */
>                   m->x      = 0;
>                   m->y      = 0;
>                   m->width  = 5920;
>                   m->height = 1440;
574,582c578
<   else if (   randr_monitors[0] &&   !randr_monitors[1] &&  /* 1 monitor */
<            xinerama_monitors[0] && xinerama_monitors[1])    /* >1 monitor */
<     {
<       *errP = append (*errP,
<                       "WARNING: RANDR reports 1 screen but Xinerama\n"
<                       "\t\treports multiple.  Believing Xinerama.");
<       free_monitors (randr_monitors);
<       return xinerama_monitors;
<     }
---
>   /* one hack over multi-monitor patch - force xscreensaver to use our hardcoded RANDR details, not xinerama */

UPDATE: patch against xscreensaver-6.05

$ diff screens-original.c screens.c
286c286,287
< 
---
> /* one hack over multi-monitor patch - blatantly overrule what randr thinks */
> nscreens = 1;
316c317,318
< for (k = 0; k < res->noutput; k++, j++)
---
> /* one hack over multi-monitor patch - ignore randr number of outputs, force 1 */
> for (k = 0; k < 1; k++, j++)
350,353c352,356
< m->x = crtci->x;
< m->y = crtci->y;
< m->width = crtci->width;
< m->height = crtci->height;
---
> /* one hack over multi-monitor patch - hardcoded resolution for this workstation's "single" screen */
> m->x = 0;
> m->y = 0;
> m->width = 5920;
> m->height = 1440;
482c485,486
< if (xinerama_count > randr_count)
---
> /* one hack over multi-monitor patch - force xscreensaver to use our hardcoded RANDR details, not xinerama */
> if ( 0 )

KDE Plasma 144hz compositing with mixed 144hz/60hz screens

Heres a quick hack which is the result of a few hours of sleuthing.  With a multi monitor setup and some of them running at 144hz and some at 60hz, theres 2 steps to getting that buttery 144hz scrolling and animations (and screensaver) as of 201809 on an up to date gentoo system.

Firstly, edit $HOME/.config/kwinrc and add these 2 lines under [Compositing]:

MaxFPS=144
RefreshRate=144

You also need to force vsync OFF for kwin_x11, else compositing will be locked to the refresh rate of the slower monitors. Tearing will become obvious but mostly on the 60hz monitor(s). Its very hard to see tearing at 144hz. Heres the command I run to switch vsync off for kwin_x11 for the current session:

vblank_mode=0 kwin_x11 --replace &

Setting “Tearing Prevention” to “Never” in Compositor under System Settings appeared to do nothing.


System76 Galago Ultrapro (clevo W740SU) Fix for powering off during POST

The Ultrapro is still doing its workhorse thing beautifully after 5 years albiet with a worn battery. Roughly every year however, a problem re-occurs where pressing the power button to turn the laptop on results in the light coming on, then going off after about 2 seconds. If this is repeated, the system eventually POSTs and boots up normally after 20 or so tries.  The fix for this situation is to reflash the bios. I’m not sure exactly how this fix works but i suspect something to do with the “Erasing NVRAM” during bios flash.

I’ve repeatedly asked System76 to provide some public (google-able) downloads and instructions for updating the bios on the Galago Ultrapro, but my pleas have fallen on deaf ears. (System76 support please refer to Cases #19410, #29997, #11821).

I managed to search through my previous downloads and find the precious zip file originally provided for me by System76 support many years ago via a (now dead) dropbox link. This is the latest bios you will find anywhere for the clevo W740SU that still returns system76 strings correctly to the system76 drivers. Here is what it looks like in the bios screen, note the RS76a version number:

Heres the precious disk image: https://www.jabawok.net/legacy/system76-galago-ultrapro-bios/galu1.img.zip

  • Unzip and dd to a USB flash drive
  • Boot up (F7 boot menu to select the USB if you can get the laptop to POST). Its a Freedos environment.
  • Flash the Embedded Controller, then the BIOS proper by typing (I cant remember – there may be a reboot required between the two steps):
cd \ec
ECFLASH.BAT
cd \BIOS
flash_4M.bat
  • Reboot and F2 into bios – reset to defaults and go through the menus to check defaults. Save and Exit.
  • If running a gdm3 based distro like the default System76 provided Ubuntu, take note that some sort of Display ID will change during the bios flash/reset. I had to log into a text console (alt+F2) and remove the gdm config before it would fire up (sudo rm -Rf /var/lib/gdm3)

For completeness, please note that this system76 bios still wont (afaik) support UEFI boot, if you’re after that functionallity you’ll need to install the latest clevo bios. Do some research first – this will remove the system76 strings from the bios so dmidecode wont detect it as a galu1 anymore. See this site (thank you kind person for mirroring this!): https://repo.palkeo.com/clevo-mirror/W740SU/


System76 Galago Ultrapro (clevo W740SU) 2 year review, plus power issue fix/workaround

I’ve been using a Galago Ultrapro laptop since they came out in 2013, and for the most part I’ve had an excellent experience. I love the (replacement) keyboard, the large touch-pad and the IPS screen. Even a few years on, the specs are just fine (haswell core i7, 16G, 128G ssd) and I’m still running the as-shipped Ubuntu install, dist-upgraded along the way to up to version 15.04. It’s worked flawlessly, is blazingly snappy, everything just works, and I’ve had no reason to change it.

After fixing some of the initial show stoppers (replacement keyboard with new revision to fix missed presses,  optimised synclient settings to fix horrible touchpad defaults), I had a smooth run until about a year in, when the laptop would take up to 10 tries to power on (light would come on then turn off again). After several emails back and forth with system76 support, I tried a new firmware/bios version, which completely fixed that problem.

Another year of flawless operation, and I’m now getting a charging issue. Occasionally the laptop wont charge, with no charge light and no OS charge indication. Eventually the laptop battery goes flat and no combination of buttons or 19V charger will charge it. The first time this happened, I left it overnight with nothing connected and it fired up ok the next morning. The second time, I left it for a full weekend and still got nothing.

After System76 informing me that it would be $500 parts and $176 labour for a new main board (so over A$1000 not including shipping!) I thought I’d mod the laptop and attach a charge lead to inject power directly into the battery. I pulled the back off and manually injected some power into the battery terminals (bench lab power supply @11.1v with 500mA limit to be safe). After a few minutes of pressing the power button (had to press power button for the battery to start accepting charge), the laptop powered up.

Proof of concept done, I went ahead with the mod, carefully drilling a slot into the alloy case, and carefully soldering wires and a JST RC hobby connector with a 6A in-line fuse onto the battery + and – terminals. The wires and fuse sit in the (empty) 2.5″ hard disk bay.

With the laptop back together and working, I thought I’d just try the normal charger one last time – low and behold it worked. Somehow in the process of disconnecting the battery and/or manually charging it, a state somewhere has been reset and the charge controller on the main board (or in the battery?) is happy again.

With the mod probably not needed anymore, I’ll unscrew the back and push the connector inside into the empty 2.5″ drive bay, until its needed again (hopefully not!).

I’ve provided some photos of the (now hopefully pointless) mod, and general disassembly, in the hope it might be useful to someone.

20150902_001 20150901_023 20150901_020 20150901_019 20150901_018 20150901_017 20150901_006 20150901_005

Google deliberately breaks Android XMPP (Jabber) Instant Messaging.

In May this year, Google in their infinite wisdom has migrated everyone using Google Talk (baked into Android since day dot) over to the Hangouts app. There’s a problem with this: Hangouts is not XMPP compatible and is not federated with the rest of the XMPP network. Here’s a quick breakdown of what this means:

  • Google Talk app can message to Hangouts and all XMPP contacts.
  • XMPP apps (like PSI, Miranda, Xabber, Empathy etc) can log into Google Talk service and then message Hangouts and all XMPP contacts.
  • XMPP apps logging in to other servers (jabber.org, jaim.at etc) can message all XMPP contacts including Google Talk but NOT Hangouts.
  • Hangouts users can message ONLY to Hangouts and Google Talk service users.
  • Theres no way that I can see for telling which of Google Talk or Hangouts a  *@gmail.com contact is using.

google-hangouts-interop-fail

This is of course incredibly disappointing for anyone who relies on XMPP instant messaging and uses a server other than Google’s, as most regular users on Android phones are of course using whatever Google makes available to them (ie Hangouts) and are now cut off from the rest of the XMPP network. This amounts to about a third of my contacts. So much for interoperability, Google.

Recommendations for gmail.com users:

  • If you connect to Google Talk server using an XMPP client (like the “Talk” app on Android) rather than the Hangouts app, you’ll have connectivity with Hangouts users as well as XMPP network users, as per usual.  There are plenty of other good XMPP clients; I’ve tried xabber on Android and it works nicely. PSI is a great client for desktop Windows/Linux/Mac. Mac supports XMPP through iChat, and most Linux distros include XMPP support in their default desktop environment.
  • Google Talk the XMPP app is now discontinued, but Google has made no announcement that it will discontinue the service itself. You may wish to consider what happens if they ever do. I for one am predicting it’s demise and jumping off the Google ship as of today.

Removing the adware that ships with stock Ubuntu 12.10

This is here more as a reference for me and anyone else that sees the annoying ads that appear in the launch page on recent ubuntu versions.

sudo apt-get remove unity-lens-shopping

The fact that this needs to be done on every new install of Ubuntu is a catastrophic fail, and canonical should be deeply ashamed of themselves for causing this embarrassment to Linux advocacy.

ubuntu clean install adware

screenshot example of the advertising built into stock ubuntu launch menu


Keeping the awesome N900 running a little longer after a hard life

Without a doubt the best and most heavily used device I’ve owned sofar, the N900 continues to be the laptop-in-pocket solution that comes out when other more modern devices lack the power and versatility.

Which is why it was sad when mine started dropping calls and 3G data link saying “SIM Card error” and showing things like this in the dmesg kernel log:

Sep 19 09:16:09 Nokia-N900 kernel: [ 2040.272857] * CMT rst line change detected (0)
Sep 19 09:16:09 Nokia-N900 kernel: [ 2040.272888] *****
Sep 19 09:16:09 Nokia-N900 kernel: [ 2040.272949] McSAAB: ACWake line 00000002
Sep 19 09:16:09 Nokia-N900 kernel: [ 2040.272979] McSAAB: CAWake line 0
Sep 19 09:16:09 Nokia-N900 kernel: [ 2040.272979] McSAAB: Main state: 2
Sep 19 09:16:09 Nokia-N900 kernel: [ 2040.273010] McSAAB: RX state:00
Sep 19 09:16:09 Nokia-N900 kernel: [ 2040.273040] McSAAB: TX state:02
Sep 19 09:16:09 Nokia-N900 kernel: [ 2040.273040] McSAAB: CMT was ONLINE

I started researching in earnest for something that might come close to replacing the functionality of the N900 but soon became depressed at the options as at July 2012. These features of the N900 are the ones that I so desire, and may well deem it, sadly, the last of it’s kind:

  • “Full” Linux distro as the OS, with APT package management and xorg graphics, all the normal libraries, bash, python, openssh etc –  just like running ubuntu (for example) on a laptop.
  • Hardware keyboard (well thought out layout with the linux hacker in mind) – without a hardware keyboard VNC/RDP are very close to unusable.
  • Resistive touchscreen (yes thats right) with a sharp stylus, for accurate and fast VNC/RDP. This prevents a heap of zooming in/out and struggling with drag/drop.
  • FM Transmitter (functionality of which might be possible on more modern phones using bluetooth and replacing my cars’ decks.)

Getting all of these features simultaneously in a phone, as well as the usual requirements which are nowdays easily met (64G storage, a good cam, good video with good audio recording, at least 800×480, etc) was proving to be nigh on impossible, so I started the long-shot search for a fix.

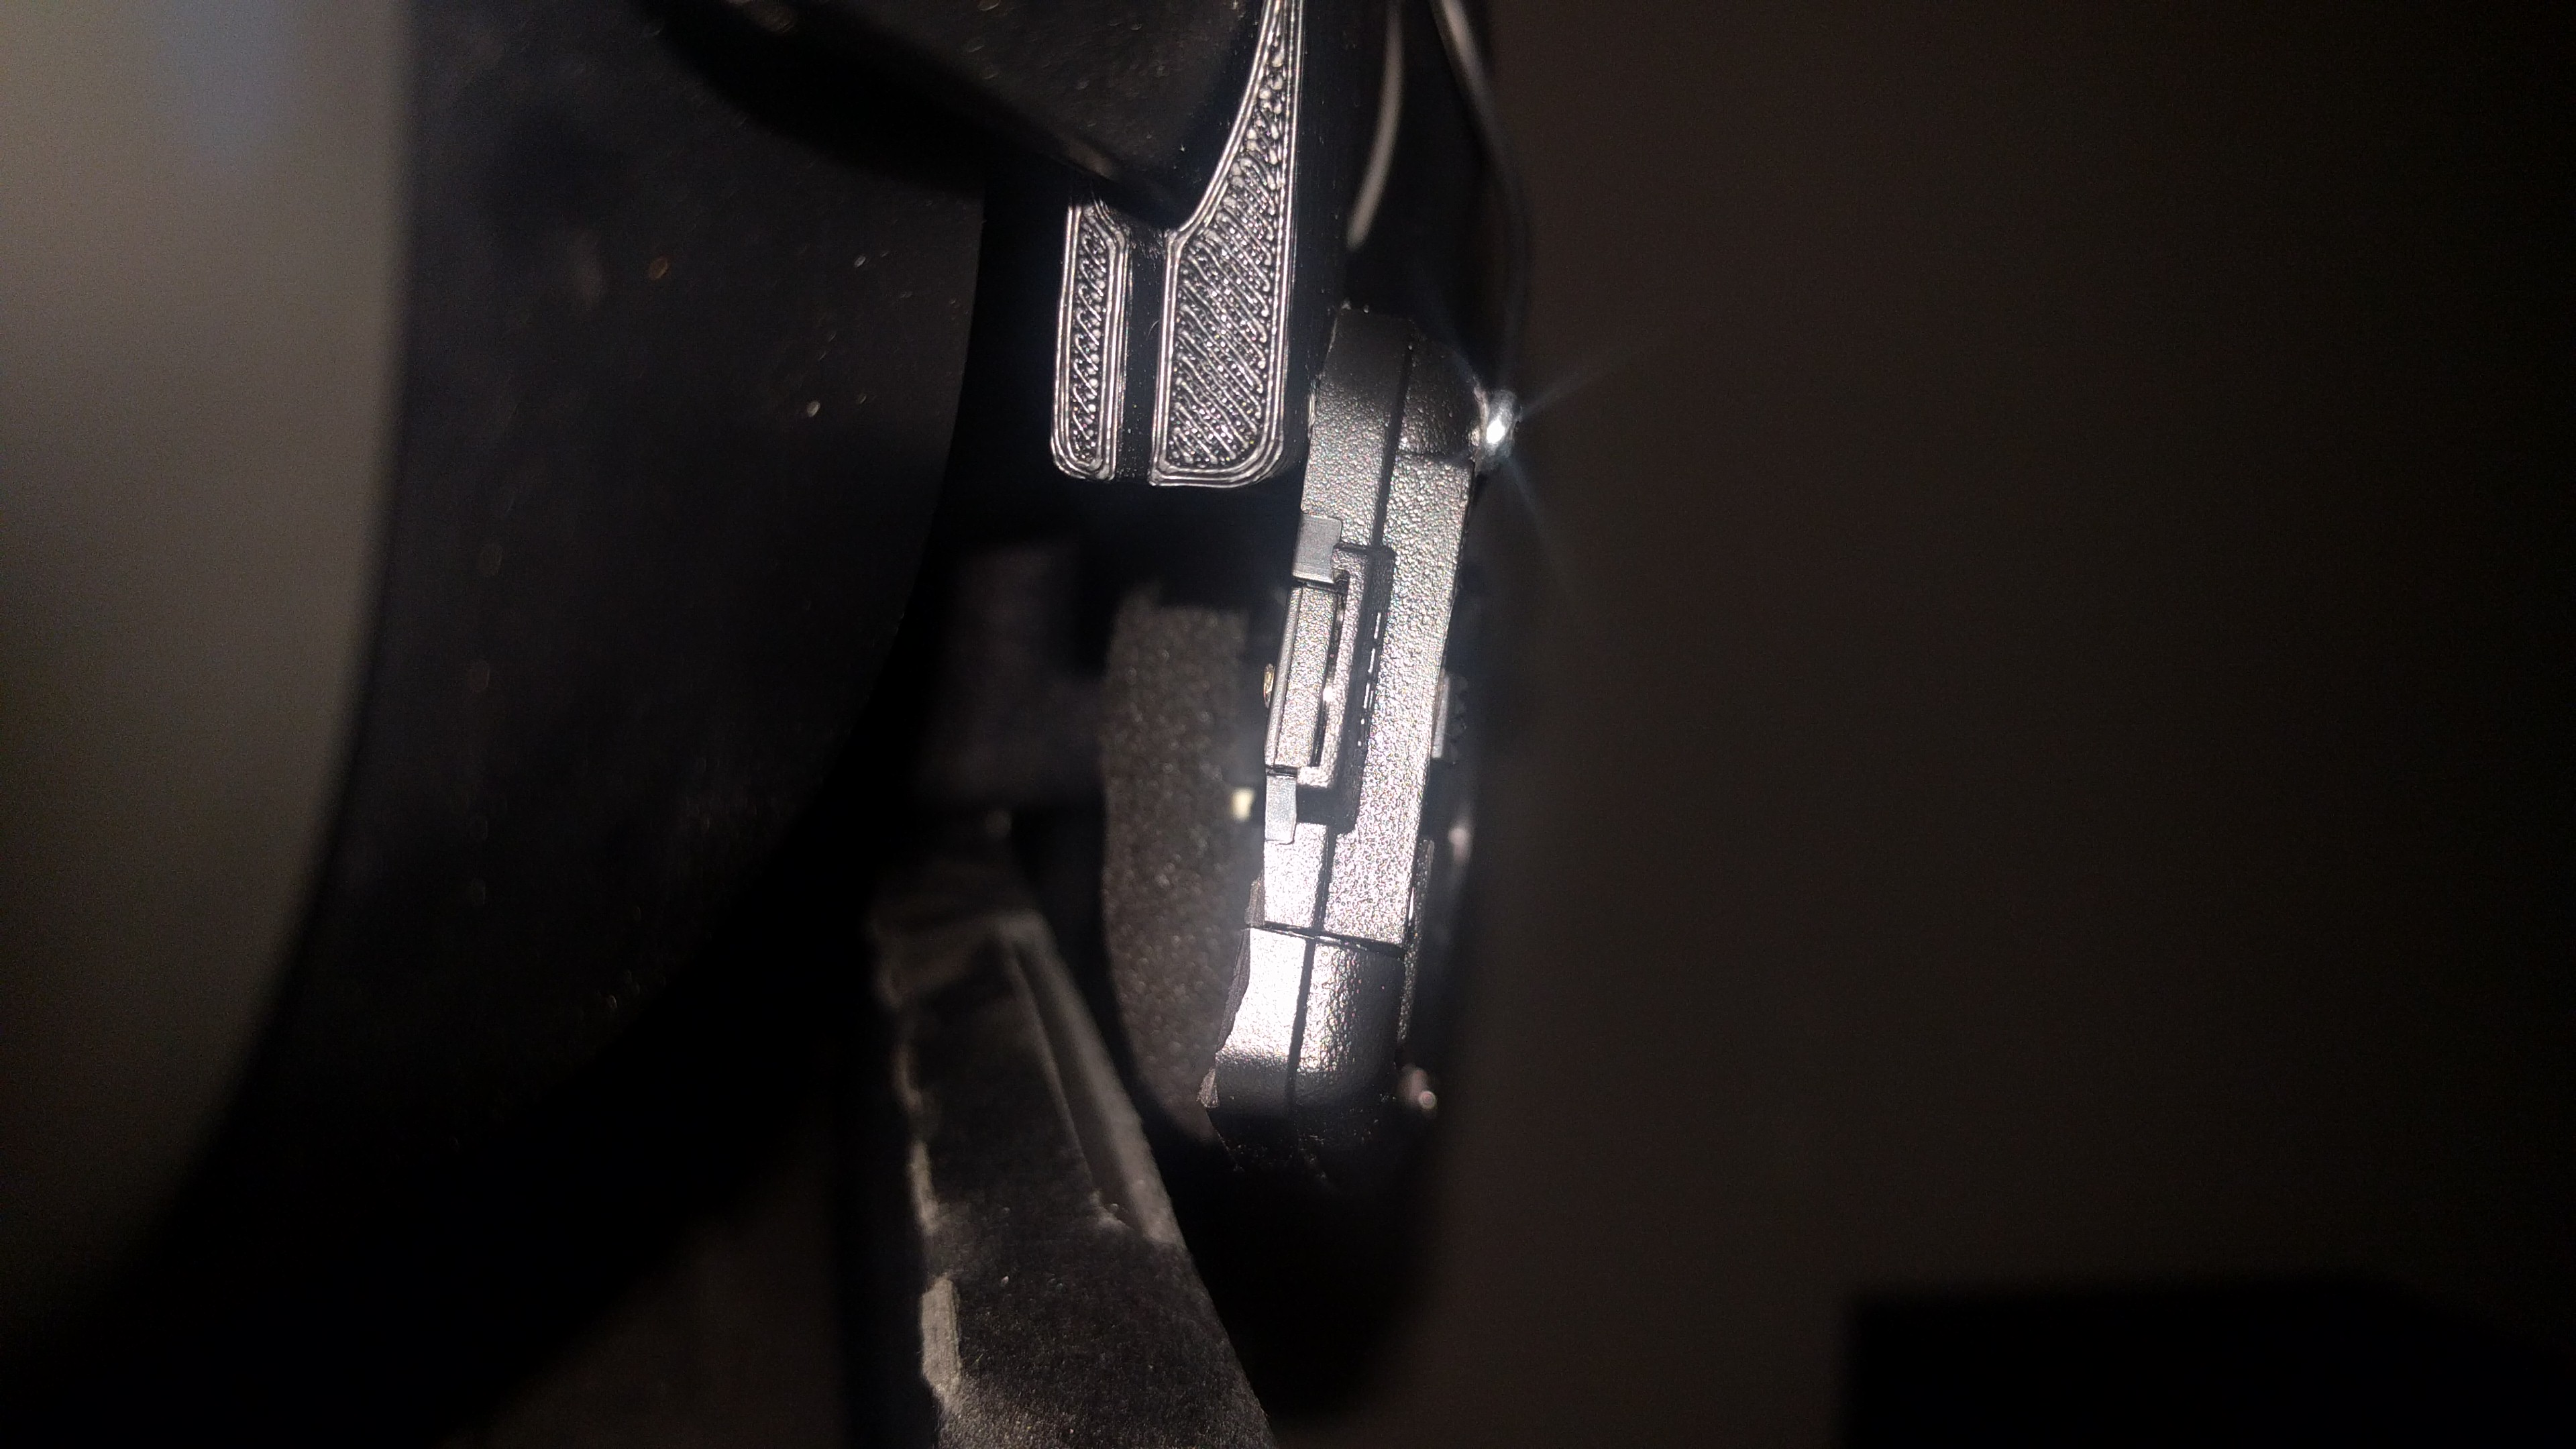
A potential fix was discovered in this thread over at nokia talk forums by “ForeverYoung”. Many thanks! He worked out his problem was the GSM chips which are coming away from the board, so devised an ingenious solution using springy metal to push the chip harder onto the board. Some of his photos are here.

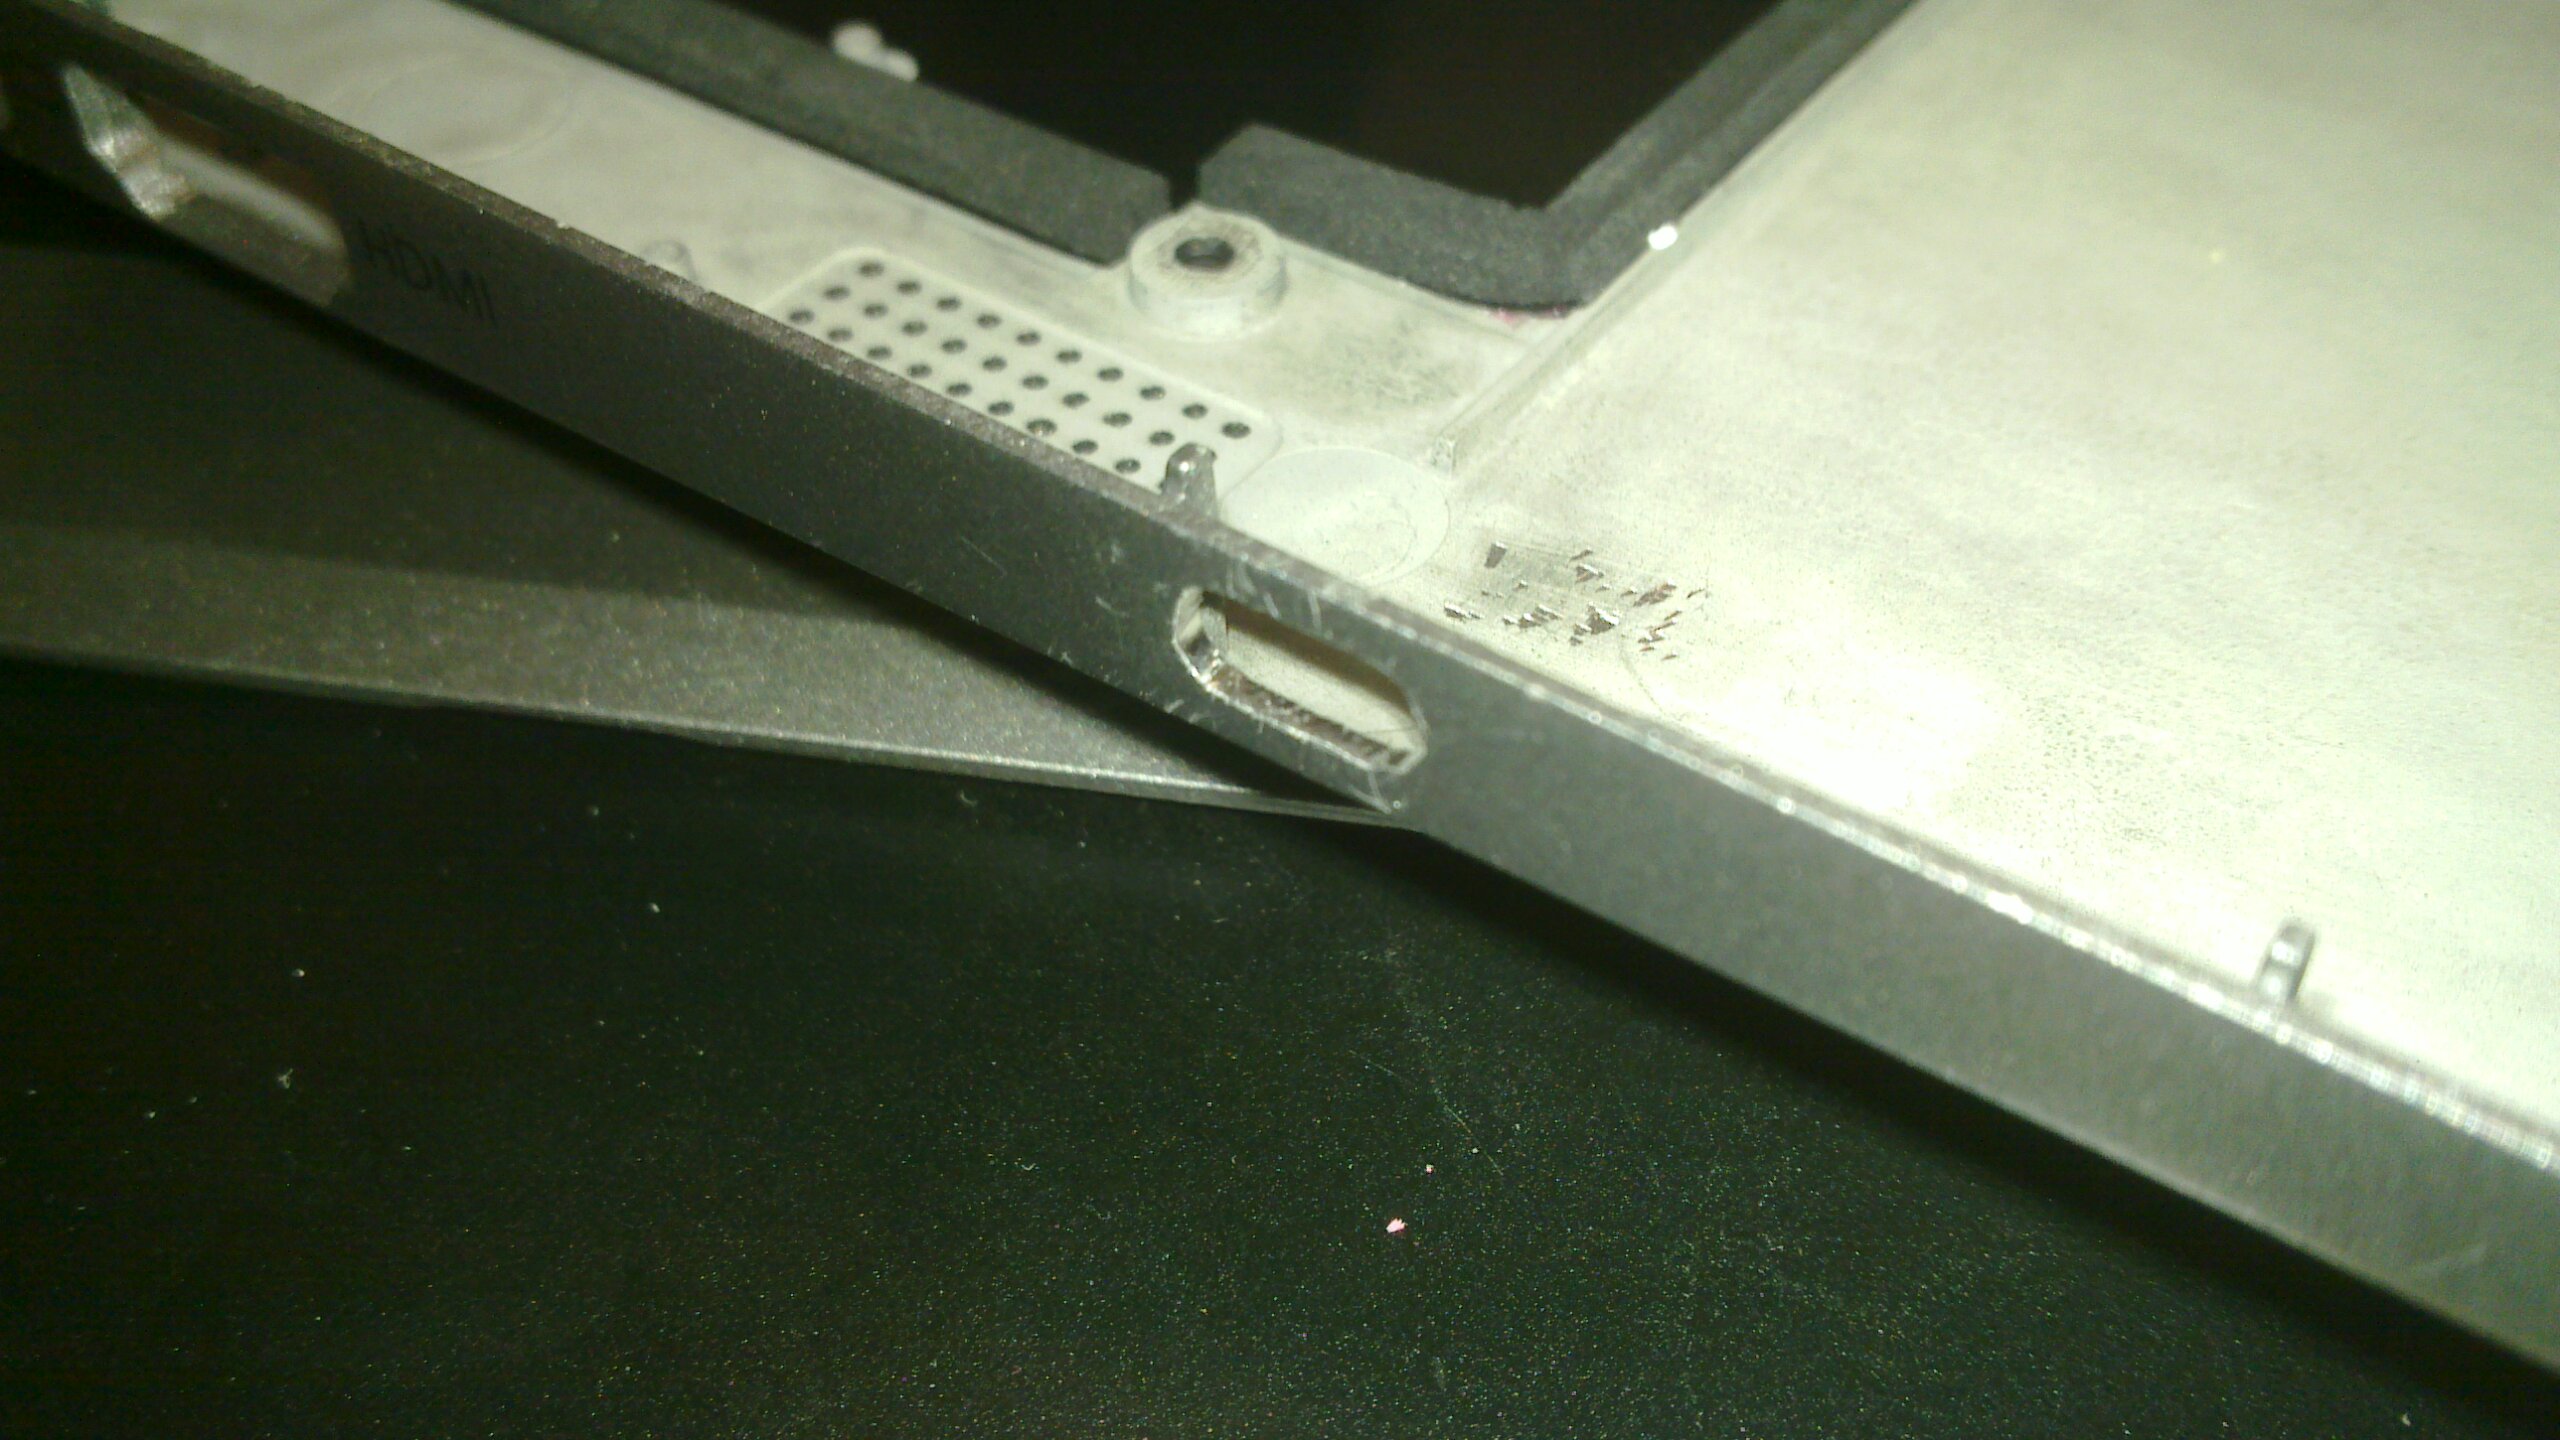
Heres my version of the fix, using a spring out of a biro/pen. Click on the images for bigger versions.

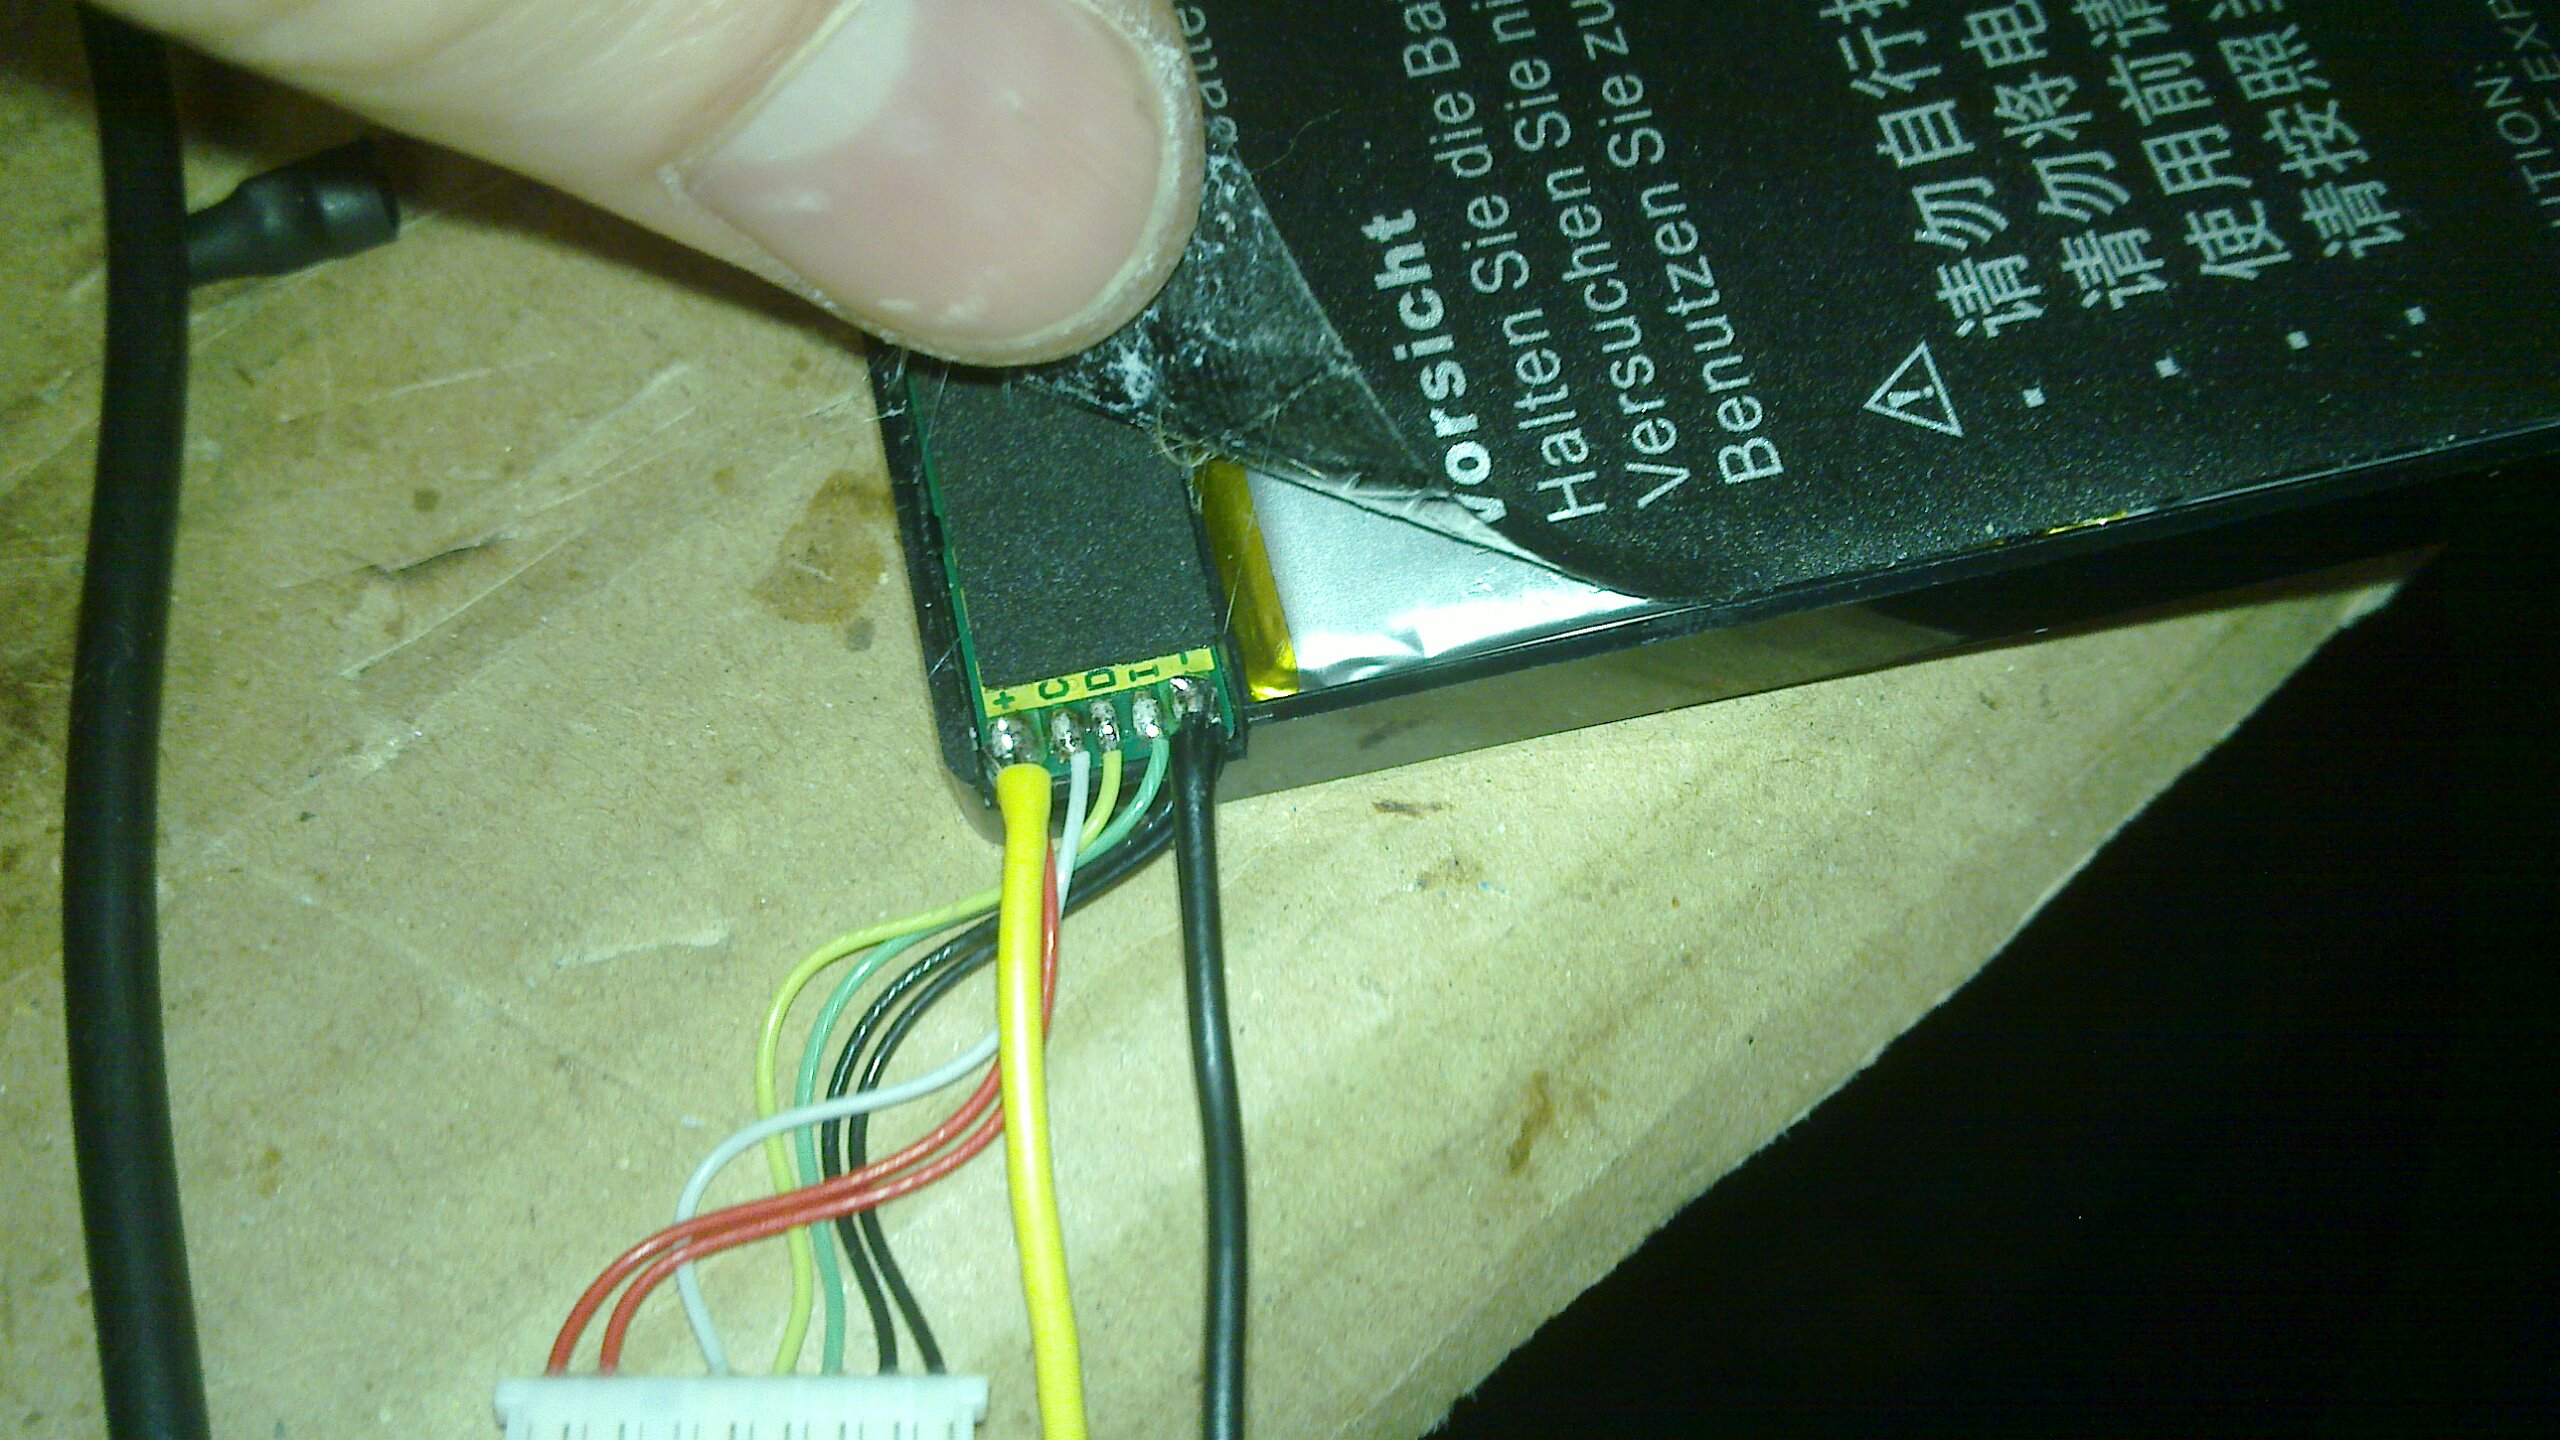
The above two shots are the first attempt, using small pieces of spring. I used “high” grade threadlocker to goo them in place. These turned out to be too small / not enough downforce, so I redid the fix.

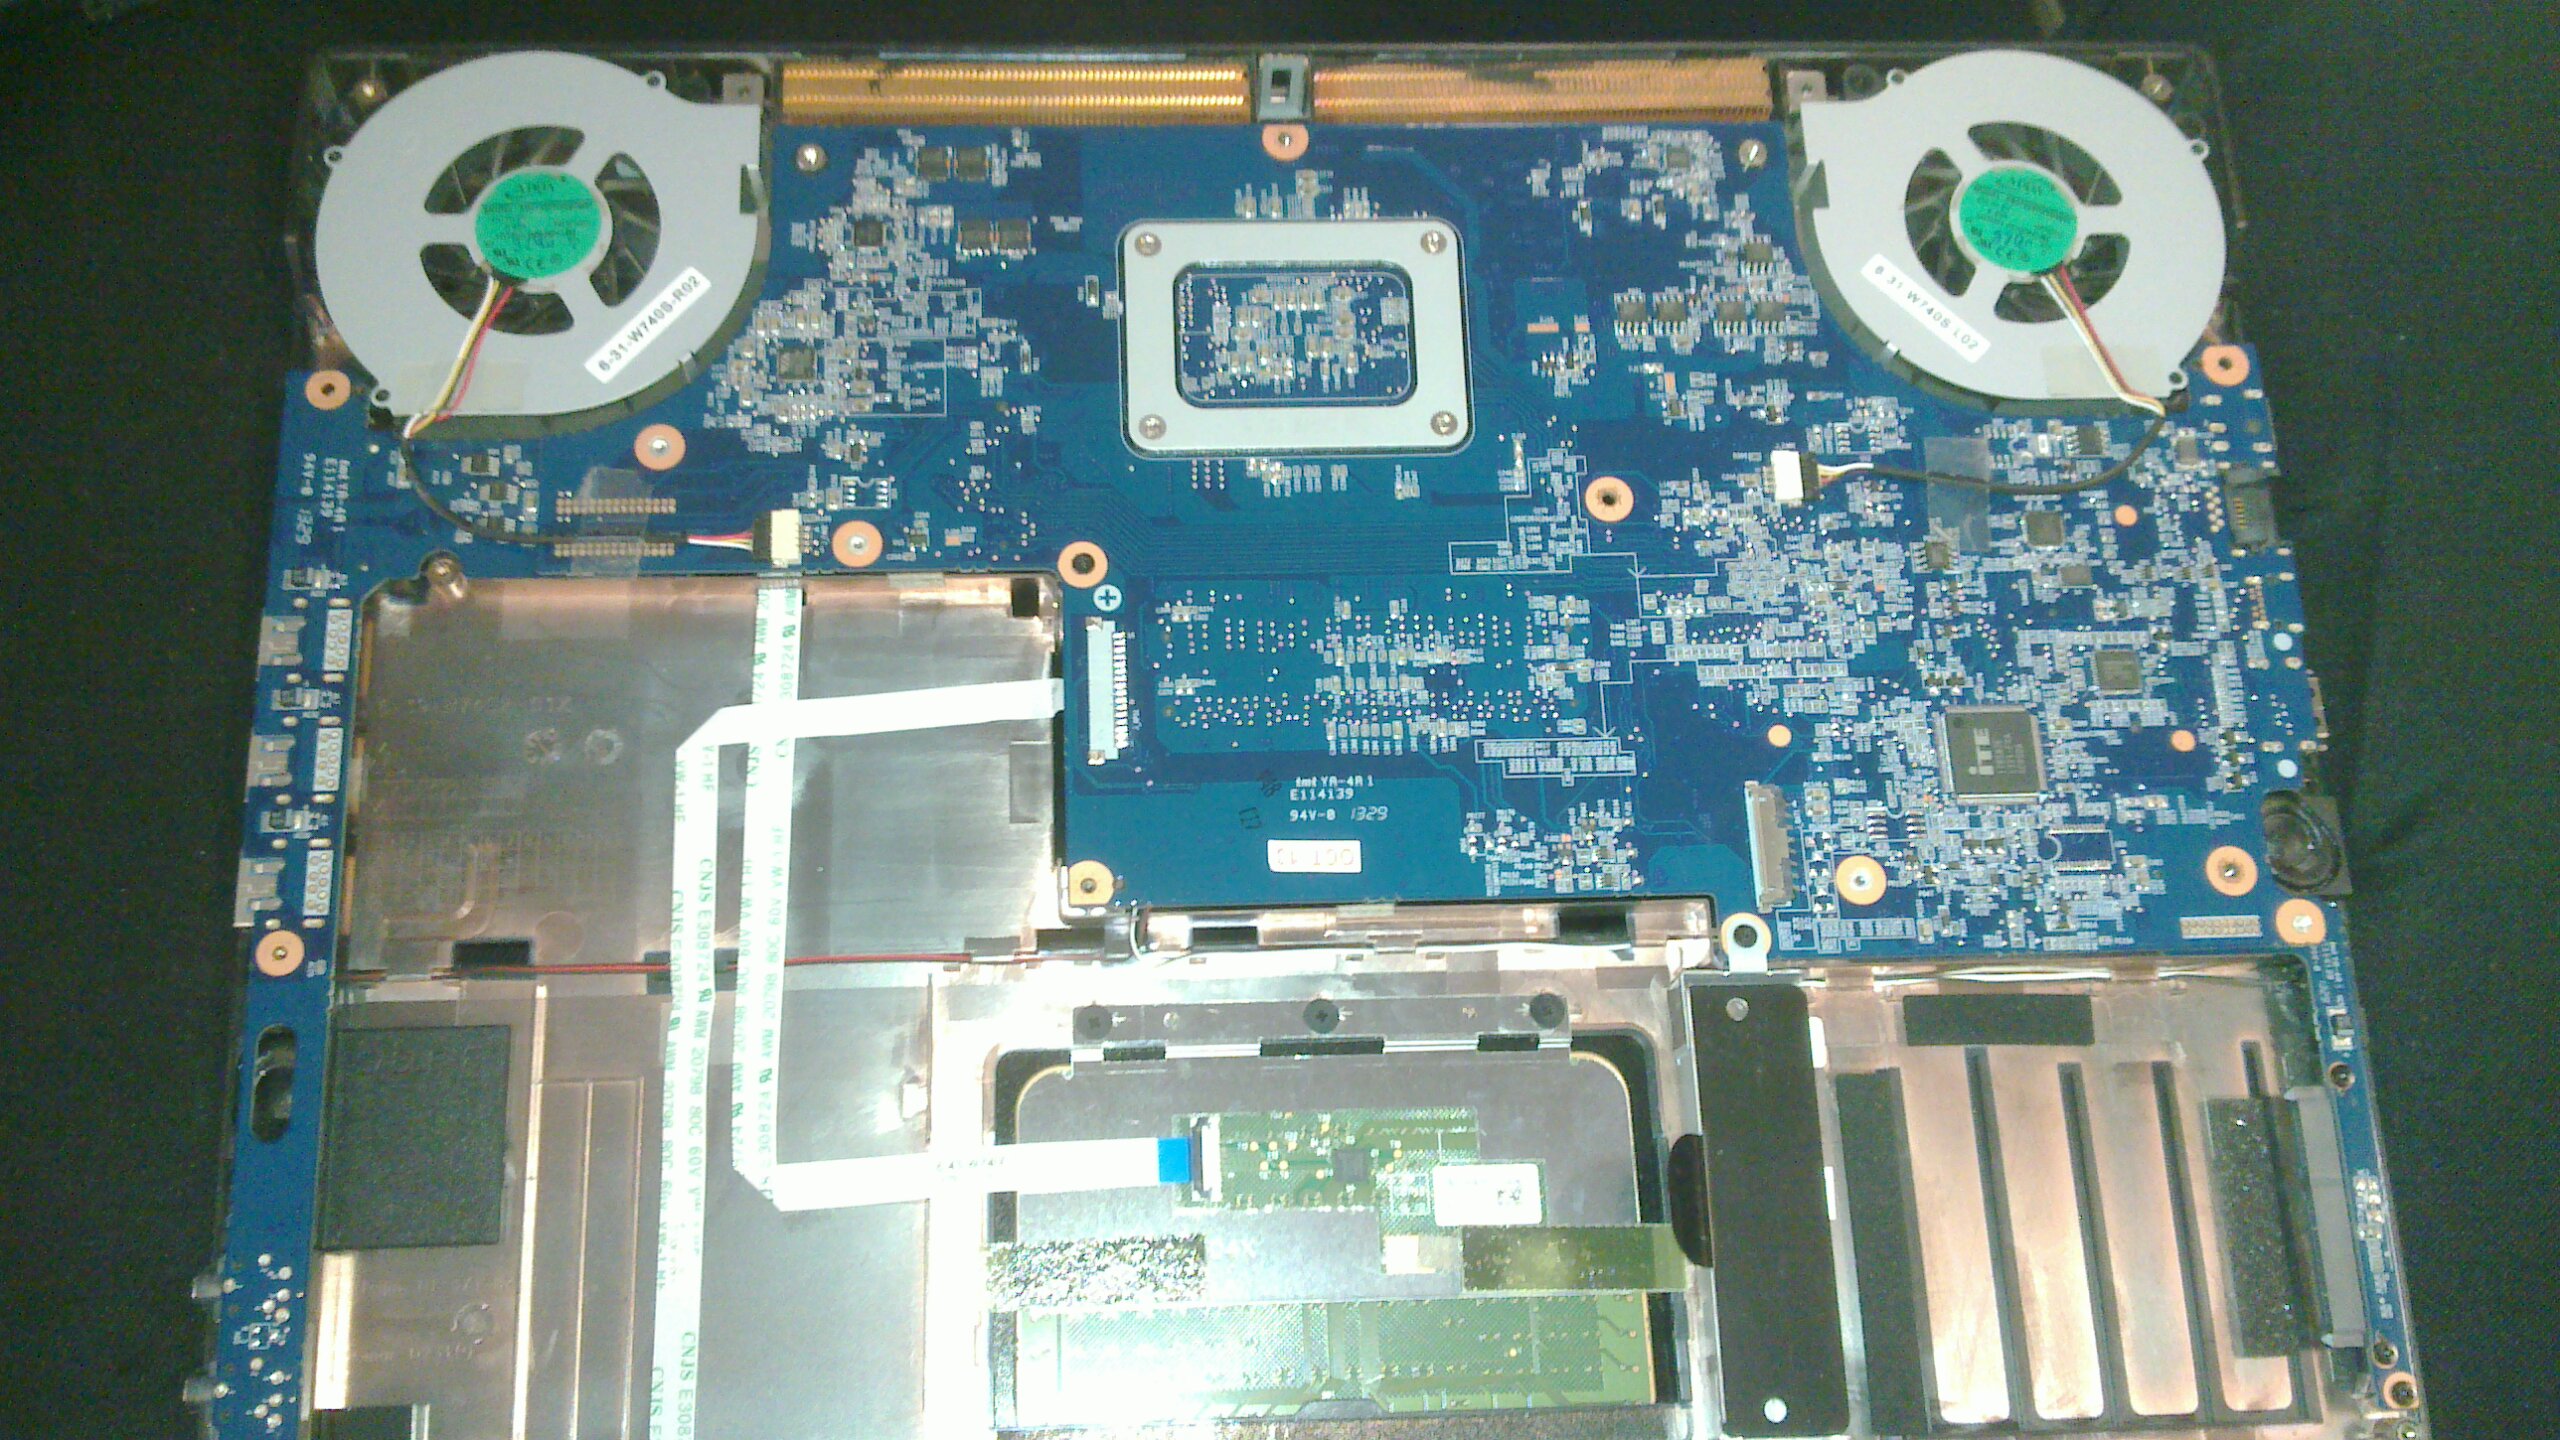
Above is the final fix that worked. I used all the old pieces, plus a couple of bigger bits of spring. to push down on multiple points of the chips. (Note the previously fixed micro-usb connector, locked in place with solder between the connector sides and PCB which was stripped back to the ground copper)

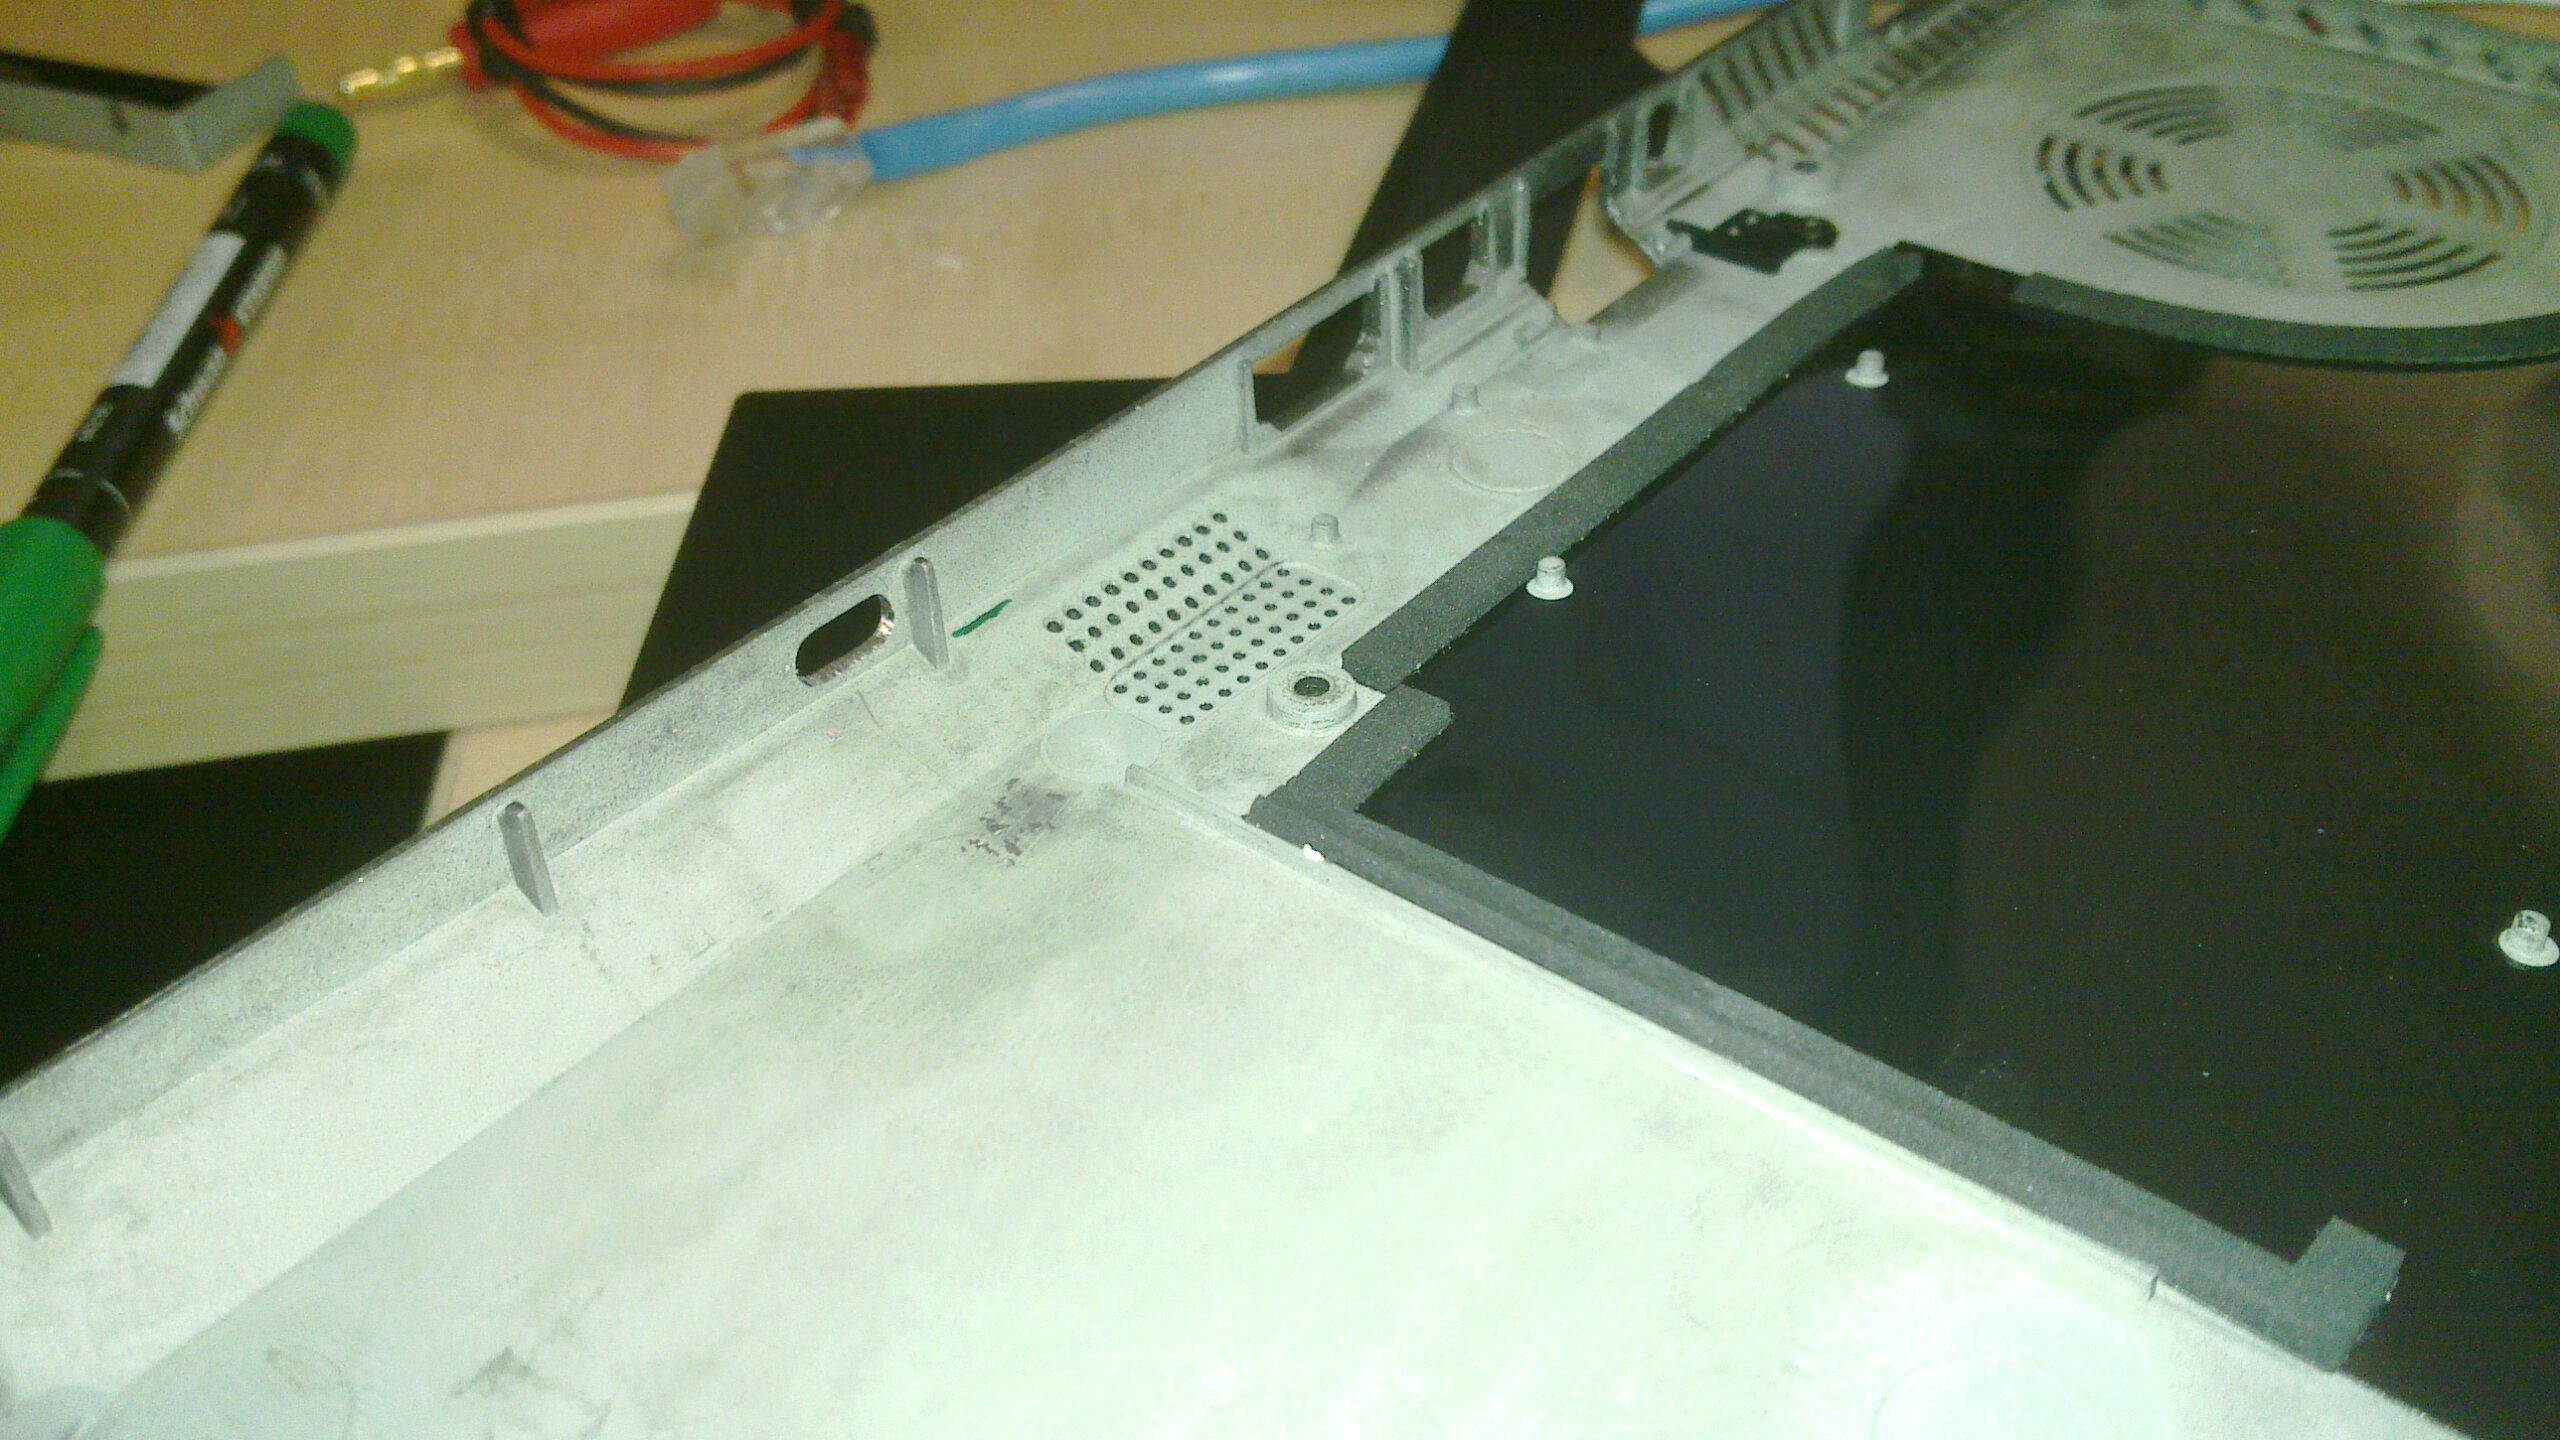
Above shows the shield back on, and you can see its clearly distended, so theres a good amount of down-force on the chips.

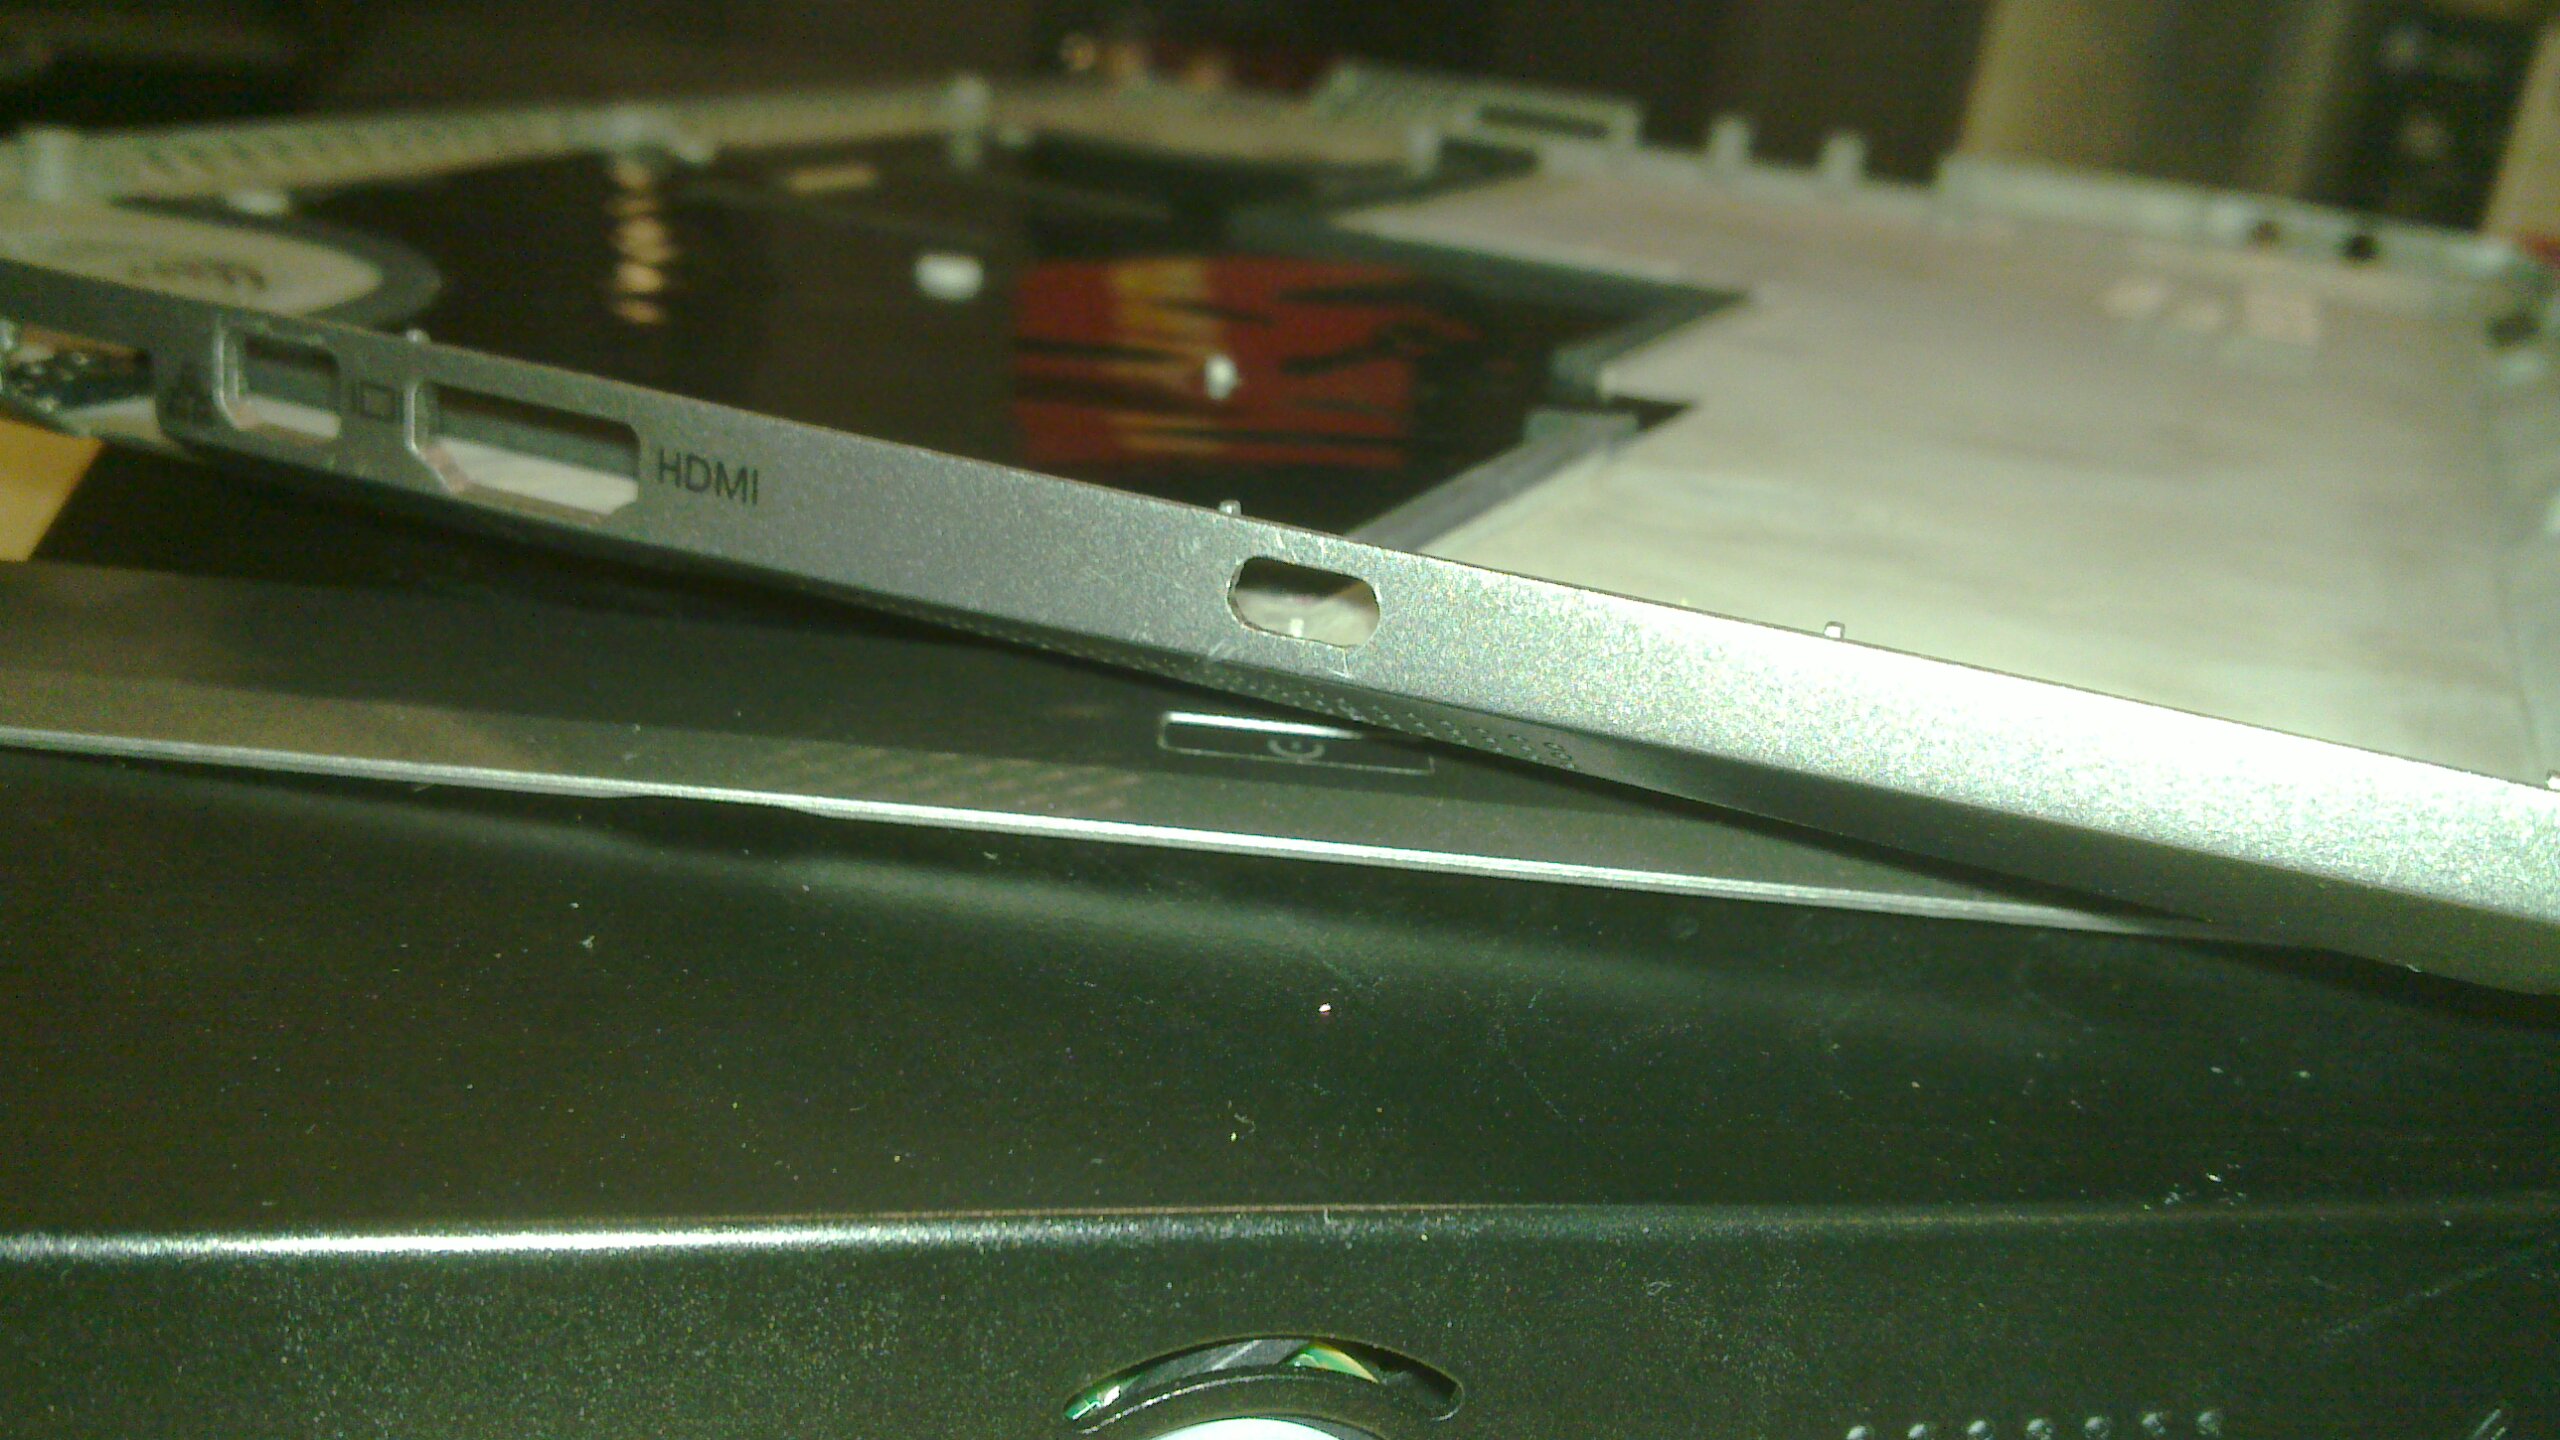
And voila.. rock solid 3G again! I can abort my search for a new capable linux phone, at least for now.

Church of Scientology vs Wikileaks

This is going to be an epic battle in which I really can’t see the Church of Scientology winning. Wikileaks has posted the full Operating Thetan here. On the same page is the Church of Scientology’s response in the form of a threatening letter from their lawyers. And here is an analysis of the so-called sacred documents.

Here’s another random combination of numbers and letters, for your enjoyment:

ed2k://|file|scientology-ot-levels.pdf|17788660|977911F17568753C60114C13A0FDEA4B|/

A message for AACS LA

I just feel like sharing some random hex pairs:

09 F9 11 02 9D 74 E3 5B D8 41 56 C5 63 56 88 C0

From 100,000 to over 2 million google search results growth in one day…  They are going to have a hard time censoring the above hex number. A couple of related amusing links:

A poem written around the banned number.

One of the main Digg threads, while it lasts… (scroll down for great ascii art).

This guy has tattooed the banned number onto his chest.

I’m sure there’ll be many more amusing works of art created. It’s DeCSS all over again.

Mythweb + Daylight saving in Perth, Western Australia

If you updated your operating system correctly to the latest timezone updates – tzdata-2006p (which you probably have, as most distributions have provided updates automatically), then you would have noticed that mythtv’s internal program guide hasn’t skipped a beat, provided mythtv’s TimeOffset setting is set to “Auto”. All your shows should be recording at the correct time. Mythweb, however, will have still been one hour out (ie “Ten News at Five” displays as being at 1600h on mythweb only). Mythweb is PHP based, and as such doesn’t use your operating system’s timezone data. PHP has it’s own timezone database. As of this date, the 2006p timezone update has made it into php’s upstream CVS, but as far as I’m aware, there have been no official releases of php since that commit. You could grab a diff from PHP’s CVS here, and compile your own version, but I suggest a much simpler work around until an official version filters down to the various distros: edit php.ini and set date.timezone = Asia/Tokyo which is the required +0900 offset that we need. Restart apache and your mythweb will be fixed.

Gow Real Estate, Perth, Western Australia

Every time I’ve dealt with them – in person or over the phone, I’ve felt like strangling somebody. They have broken promises to follow up on many issues we had, particularly to do with incorrect (in their favour) rent collected. Many of their agents, including the head honcho (Dee Gow) seem to have attitude problems (“we’ve been doing this for xx years, so dont tell us how to do our job…” sort of attitude). Thankfully the property we live in is not managed by them any more, but we were quite amused to talk to the new real estate agents (who have been wonderful) and find that they had a very bad experience dealing with Gow in the changeover procedure. Changing over to Gow was also apparently a major issue for the real estate agents we had previous to Gow (and a bad experience for us also).

Gow Real Estate – you should avoid them in my opinion.

I hope this information is helpful to somebody

Commodore VS V8 Dissys

Symptoms: Randomly doesn’t start. After anywhere between 30 seconds to 60 minutes (or longer), the injectors pulse once (click) and the fuel pump fires up for a few seconds. After this point, the car starts normally. Sometimes (less often) the engine stops whilst driving, followed by the above procedure of waiting for the “problem” to reset. ECU code retrieval (bridge pins 5 and 6 on the diagnostics connector under the dash – watch flashing engine light) reveals error code 46 (No Reference Signal while cranking). Problem seems worse after stopping the motor and trying to restart it, for about an hour or so afterwards.

The Problem: faulty Hall Effect sensor located in the distributor.

Info and some hints: VS (and probably VR and VN etc) Holden Commodores with V8 motor do not have a crank angle sensor on the front like the V6 ecotech. The only way the computer knows when to pulse the injectors and fire the electronic ignition is from the hall effect sensor in the distributor, which activates each time a gap in the hall rotor passes by it. Obviously the hall rotor has 8 gaps. Some tips: Dont muck around – remove the bonnet straight away. Grab some soft pillows to put on the engine so you can kneel on it – getting the distributor out is really tricky, because theres only a very small gap between the intake manifolds and the firewall. It does pull out though, although mine was really really stiff. Siemens don’t make the original hall sensor anymore, you can get a “universal” replacement from most good auto parts shops. You’ll need to drill the rivets out of the old sensor and attach the new one accurately in the right position, as well as solder/rewire it into the existing connector.

-update: you can get the exact replacement part from Altronics and probably Jaycar